I recently acquired a Beretta M9-22lr pistol. This pistol is a Umarex replica of the 92FS / M9 handguns found in the US Military. I shoot a 92F in 9mm on a pretty regular basis and when this pistol came out I was very excited to get may hands on one. To start with the gun actually feels and functions like the 92 series center-fire pistol I use. All the controls are the same as well as field stripping procedures. This is a no brainer for training with low cost 22 rim-fire and seamless transition back to my 9mm version. Below is a detailed review on the M9-22.
In addition, the M9-22 comes with 15 round magazines! This is very rare for a 22 caliber pistol to come from the factory with more than 10 round mags. There are many after market kits you can buy for various 22 pistols that allow additional rounds in your 22 magazines (YOU CAN FIND THEM HERE), but it is a nice change of pace to see the manufacturer provide these direct from the factory. However, in some states 15 bullets in your gun is more than the law will allow. So Beretta offers 10 round magazines for these oppressed states. If you have some Beretta factory 10 round magazines, chances are the basepad is glued together and not allowing disassembly. This can be a problem for cleaning dirty magazines. The steps below will help guide you to overcome the glue and disassemble your magazine for cleaning.
NOTE THE GLUE OOZING OUT OF THE CRACKS (SEE ABOVE)
USING A HEATGUN, APPLY HEAT TO THE PLASTIC BASEPAD. DO NOT GET THE GUN TOO CLOSE OR TOO HOT SO THAT IT MELTS/DEFORMS THE PLASTIC. YOU ONLY WANT TO HEAT THE BASEPAD ENOUGH TO LOOSEN THE GLUE AND ALLOW THE ROUND PIN IN THE MIDDLE OF THE BASEPAD TO BE DEPRESSED (SEE ABOVE)
ONCE THE GLUE IS HEATED AND BECOMES LOOSE, YOU SHOULD BE ABLE TO DEPRESS THE ROUND PIN TO WHERE THE TAB ON THE BACK OF THE BASEPAD WILL STICK UP (SEE ABOVE)
NOW YOU CAN SLIDE OFF THE BASEPAD TOWARDS THE FRONT OF THE MAGAZINE TUBE. TAKE CARE WITH THE SPRING AS TO NOT LET IT GET AWAY FROM YOU SINCE IT IS UNDER PRESSURE. (SEE ABOVE)
ONCE THE BASEPAD COMES OFF YOU CAN REMOVE THE SPRING AND SPRING RETAINER CONTAINING THE SPACER (THE ALUMINUM TUBE GLUED TO THE SPRING RETAINER). AT THIS POINT YOU CAN NOW EFFECTIVELY CLEAN YOUR MAGAZINE AND ITS COMPONENTS. IT WOULD ALSO BE HELPFUL TO SCRAPE OFF AS MUCH GLUE AS POSSIBLE WHILE YOU CAN. (SEE ABOVE)
IF YOU LIVE IN A STATE THAT DOES NOT HAVE MAGAZINE CAPACITY RESTRICTIONS, THIS IS WHERE YOU CAN REMOVE THE SPACER AND ALLOW AN ADDITIONAL 5 ROUNDS TO BE LOADED INTO THE MAGAZINE. WHILE THE GLUE IS STILL HOT, PLY OFF THE SPACER AND REASSEMBLE THE MAGAZINE WITHOUT THE SPACER. YOU SHOULD NOW BE ABLE TO FIT 15 CARTRIDGES IN THE MAGAZINE.(SEE ABOVE)
The GSG / Sig 1911-22 compensator is HERE! It's offered in black anodized aluminum or bare silver ready for use or to coat in your own distinct color. The compensator attaches easily to your threaded barrel with out the need to remove your barrel bushing. You can get it on our website www.GSGparts.com
The base of it is milled out to give you clearance between the comp and the barrel bushing but still sit close enough to the muzzle of the gun to give that seamless look. The exit hole on the comp is a 9mm diameter so if you have a speed type holster that uses a muzzle plug to help retain the pistol, it should work in your holster giving you the ability to use your IPSC gear with your 22.
Remove factory thread protector
Screw on and tighten the compensator adapter with a 13mm wrench
Apply red thread locker to the area where the compensator adapter mates up with the compensator
Slide on the compensator and finger tighten the set screw with the included wrench. Take care to line up the flat sides of the compensator with the flat sides of the slide for a clean look. Lock the action open with the slide lock and allow the thread locker to dry according to factory specs. Locking the action open will aliviate any extra thread locker from making contact with the muzzle.
One of the easiest and least expensive ways to reduce the weight of the trigger on your AR15 rifle is to replace the stock hammer spring with a Reduced Power Spring. All you need is a punch or hex wrench small enough in diameter to push out the hammer pin located in your AR15 lower. Once you push out the hammer pin, the hammer and spring can be removed from the lower. Take note of the orientation of the spring as it sits on the hammer so that you can install the new spring in the same position.
Simply pull the spring off the hammer by grabbing one of the coils and pull. Install the Reduced Power Spring onto the hammer and reinsert the hammer/spring into the lower while pushing the hammer pin back into place through the lower. Be careful not to force the pin as you attempt to push it through the lower. Remember the lower is aluminum and the pin is steel, so forcibly hitting the pin or pushing harshly it may cause damage to your lower if all is not lined up perfectly.
In our testing we were able to reduce the trigger pull weight by 3 pounds. Our stock trigger was measuring 7 pounds with the mil-spec hammer spring found in all Lower Parts Kits (LPK). Once we installed the Reduced Power Spring, our same trigger measured 4 pounds of pull. This is a considerable amount of reduction for such a low price. Most match triggers run well over $100. Granted, this spring does nothing to reduce the creep or "grittiness" of your stock trigger like the drop-in match triggers do, but you can come close with the additional Adjustment Grip Screw Kit. For those not wanting to spend alot of money on an expensive trigger for their rifle or carbine, the Adjustment Screw and Reduced Power Hammer Spring Kit is the way to go.
Application: The Reduced Power Hammer Spring is intended for competition and recreational use only and should not be installed in any rifle used for defense or duty applications. By reducing the spring tension, the introduction of light strikes or failures to fire due to the lack of primer detonation may occur.
After selling on Ebay and Amazon for the past few years and dealing with the limitations of political correctness when it comes to firearms, we decided to launch our own website. This allows us to showcase our products and others in a more friendly environment. We continue to sell on Ebay and Amazon but having our own site helps with what we can't post on those other places. We will continue to offer products here on the Blog but the website will have a much larger variety and should be much more easier to navigate.
For all your 22 pistol needs remember the website www.22LRupgrades.com If you are looking just for GSG & Sig Sauer 1911 parts, all you need to remember is www.GSGparts.com We continue to offer calibration spring kits for the full sized 1911 to those looking to enhance the performance of there pistol at www.1911springs.com Finally we offer a variety of aggressive Grip Tape patterns for various pistols www.Pistol-GripTape.com (sold in sets of 3 unlike other merchants).
We are constantly looking to add product to our store. If you have a product and offer dealer pricing, contact us at sales@TaylorTacticalSupply.com
Due to the nature of this business, and international regulations (ITAR) we are limited in what we can sell to anyone that is not in the United States. At this point only our GripTape decals for various firearms can ship outside the US. All other international orders will be canceled.
Today action camera choices seem limitless and overwhelming. For me and self filming my shooting activities, I find that form factor plays a major roll when it comes to choosing one. That means the GoPro is not my 1st choice for an action camera to capture those First Person Shooting Videos or FPS. I prefer the Contour brand cameras because of the form factor and mounting options. They allow a more realistic view that better conveys the shooting experience as if the viewer was actually pulling the trigger. I'm now experimenting with the Sony Action Cameras and I find them to be a big plus for three important features. One, the Sony has a similar form factor of the Contour line of cameras. Two, the Sony has image stabilization in it's action cameras. This is HUGE! At the time of this review, no other action camera maker has this feature that I am aware of. Three, the Sony has OUTSTANDING audio. ALL action cameras suffer when it comes to their microphone and interface circuitry. Over the years I've noticed that the Sony camcorders seem to have a better microphone system compared to others I've used. This is also true for their action cameras.
If you are a GoPro junkie and will use nothing other than the square box... then you need to look at the W8 Action Camera. It is a Chinese knockoff of the GoPro but at literally a fraction of the cost. And the cool thing, it uses the GoPro mounting systems. I found my W8 to have very good video quality but bad audio (just like GoPro and others). The W8 also can be controlled with your smart phone via WiFi and a free downloaded App.
For those that have seen or use the Desert Eagle pistol in your video game play or even airsoft wars. Most of you know it shoots a 50 caliber bullet but have most likely never held or even seen the gun and its ammo. The first video below is shot with a high speed camera with a relatively new shooter attempting to shoot a bowling pin with the 325 grain projectile. Note the recoil or flip of the gun and the huge fireball. Keep in mind this video was shot in daylight. The flash from the muzzle is blinding in the dark.
Want to see more details and a closer look at the Desert Eagle 50 AE? This video below is a review of the gun. Be sure and watch to the end for some footage of other new shooters taking shots with it and a Freedom Arms revolver chambered in the same 50AE cartridge. That revolver is not for a new shooter. The recoil is unbearable.
In the videos below I will show you the process of reloading this monster 50AE (50 Action Express) round. Even though the video(s) is caliber specific, the information on the process is pretty much universal for reloading other calibers. If you are curious about reloading or looking for information on the subject, these two videos are for you.
After many years of dealing with my RCBS Chargemaster 1500 combo that appears to have an issue with responsiveness in reference to the keypads, I decided to make the following video and send it to RCBS and see if they had a solution for the issue. Be sure to see what really fixed the scale near the end of this post.
Here is RCBS's response via email: SOMETIMES THIS IS DUE TO THE CONNECTION ON BOTH UNITS. DISASSSEMBLY BOTH UNIT AND APPLY ELECTRICAL GEL ON BOTH CONNECTION PORT. REASSEMBLY AND PRESS FIRM ON BOTH UNITS WHEN ATTACHING THIS WILL GIVE A GOOD CONNECTION WHEN COMMUNICATING. USE A LAUNDRY STATIC REMOVER SHEET TO REMOVE ANY STATIC ON THE BLACK PLATEN. RECALIBRATE YOUR SCALE AND LET US KNOW.
So I gave the reccomendation a try. Here are the results:
In short the procedure RCBS recommended did not fix the issue. Below is the email exchange with the RCBS tech. I realize that my particular unit is clearly out of warranty and I do not have any illusions that RCBS would repair of fix my unit for free. However I thought it odd that RCBS would not "middle" any repair work since they have the most knowledge of the product and connections to the manufacturer. But instead they pointed me in the direction of a "calibration" equipment company when calibration is clearly not the issue.
If anyone knows how to fix the problem seen in the video, please let me know.
Nic: I finally got to try out the suggestion and the problem still exists. Can you assign an RMA number so I can send this scale and powder dispenser in for repair? I have the original box to ship it in.
RCBS: HOW LONG HAVE YOU HAD THIS UNIT?
Nic: it's been years. 5 maybe???
RCBS: I AM SORRY WE DO NOT REPAIR THESE CHARGEMASTER UNIT. WE PURCHASE THESE CHARGEMASTER 1500 COMBO SCALE AND OUR VENDOR DOES NOT ALLOW US TO REPAIR. PLEASE TRY TO CONTACT MICRO PRECISION CALIBRATION INC 1-530-268-1860 AND SEE IF THEY CAN REPAIR THE UNIT.
Nic: Hold on. You sell your branded RCBS unit, but do not repair or replace? But rather direct issues back to the OEM/ODM?
What is the website and address of the OEM/ODM?
RCBS: THESE UNITS ARE PURCHASE OVER SEAS BY EXCELL.
Nic: I did contact RCBS right? Not some other vendor? I find it odd that the company that brands and sells its product with it's company name on the product would point to the vender for issues and not the company that sells and markets their own products. Seems kinda like buying a Ford and having an issue with the Ford and then Ford referring the customer to the plant that assembled the Ford. Here's the site associated with that phone number http://www.microprecision.com/calibration-contact/ I do not think calibration is the issue. I will dispose of the unit and go with another brand. Thanks for your time.
RCBS: I AM SORRY TO LOSE ANOTHER CUSTOMER BUT THIS IS JUST WHAT THE POLICY ON THESE CHARGEMASTER UNITS. THERE IS 1 YR WARRANTY FROM FACTORY FROM THE DATE OF PURCHASE. MICRO PRECISION CALIBRATION IS JUST ONE OF ANOTHER COMPANY THAT I KNOW THAT MIGHT HELP. THIS MICRO PRECISION CALIBRATION DOES NOT ASSOCAITE WITH US RCBS.
Nic: Yeah, I paid the extra for RCBS when shopping for a scale because there are plenty of other brands cheaper for the same features. However, I've had good luck with RCBS until now. But it looks like the extra expense was not worth the frustration in this case. For what it is worth, I've had this issue for years with this scale. I finally got tired of messing with it.
THE FIX
After taking a few says to think on it, I borrowed another Chargemaster 1500 from a friend and swapped the parts of the unit and was able to isolate the defective part. Turns out my powder dispenser unit was causing the problem. I voided the warranty (already out of date) and took it apart with 4 simple screws. Take care not to damage the ribbon cable inside when you unplug it from the small PCB inside the dispenser.
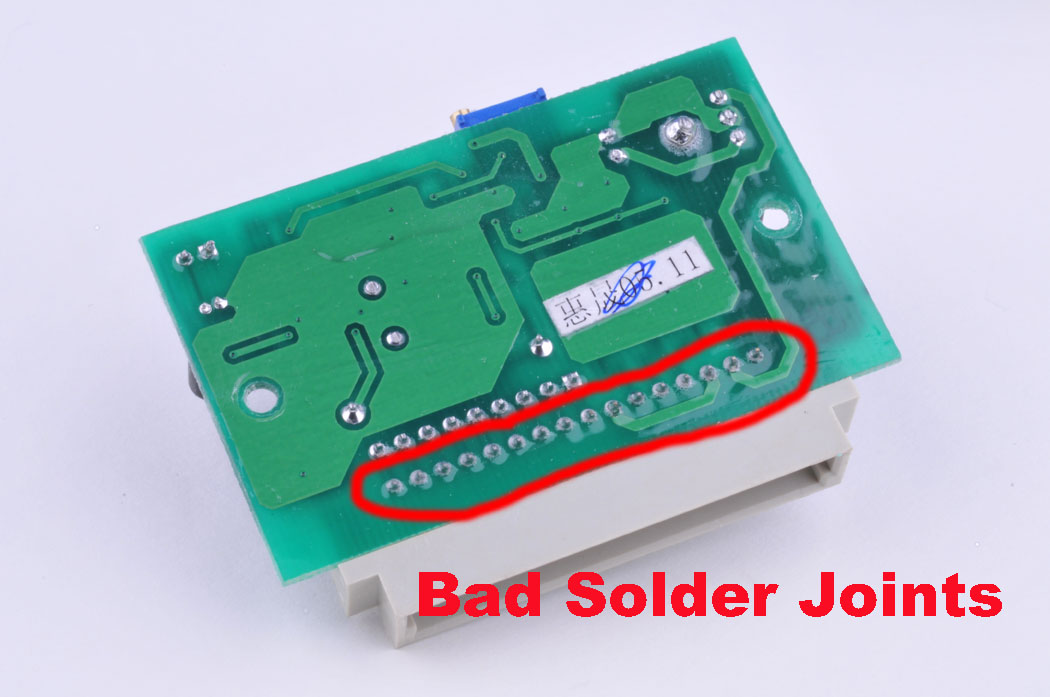
After inspecting the little PCB I found that the connector that connects the dispenser to the scale had "cold solder joints". Cold solder joints are solder joints that did not cool or flow properly when the soldering process took place at the factory. This is a manufacturing defect and should have been caught by the QA process at the time of manufacture.
This is a relatively simple fix assuming you have a soldering iron. Just reflow the solder joints on the BERG connector so that the frosty looking solder joint is nice and shinny. Adding solder to the joint and using flux will make it easier to reflow. The video below shows a sample of the soldering process and speaks more in depth of the error.