While doing some high speed camera work for a video on the aluminum AR15 bolt carrier from Whiskey Arms, I had a malfunction in my 3-Gun Rifle. The brass case broke in half leaving the front part of the case in the chamber while extracting the rear portion. This problem is due to me using re-manufactured ammunition. All the brass was submitted by me for reloading. I can't say if all the brass I sent in was all mine because I pick up range brass all the time. So I do not blame the reloading company for this. However, for my multigun matches I now use only new manufactured ammo. Below is a photo of the brass as well as another cracked round I found before I shot it.
Also included in the video is high speed footage of AR-15 doing Bolt Bounce. This is a condition I created on my own by removing the weights inside the carbine buffer. I personally can not feel the bounce but my Casio EX-F1 picked up the movement. Additionally I show how the bolt should react upon closing by using a non altered buffer. By comparing the two slow-motion video clips you get a pretty good idea what bolt bounce is.
A similar thing happened to me while I was shooting from the open door of a helicopter. Fortunately the next round had lodged into the front part of the case making it easy to remove with only my knife. I was able to clear the malfunction and get back on the gun without having the helicopter land.
Tuesday, August 30, 2016
Wednesday, August 24, 2016
M9-22 Compared to the M9 / 92f Beretta - A Five Star 22 Pistol!
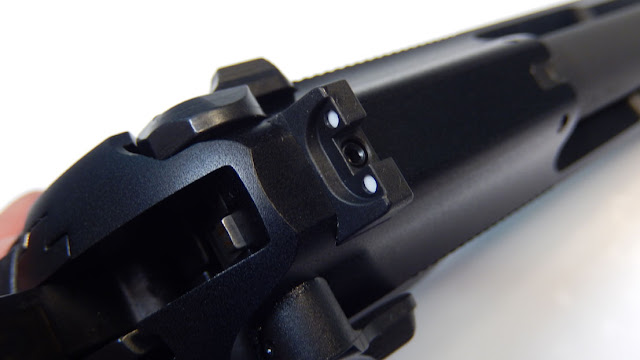
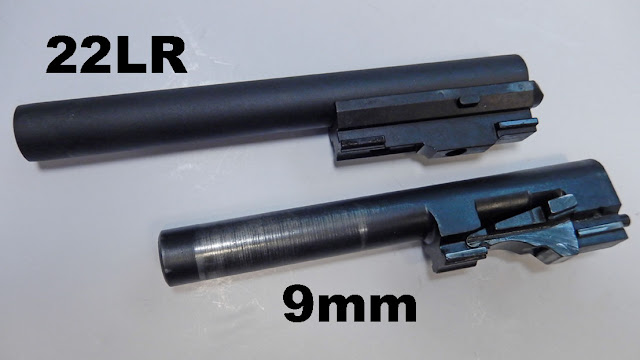
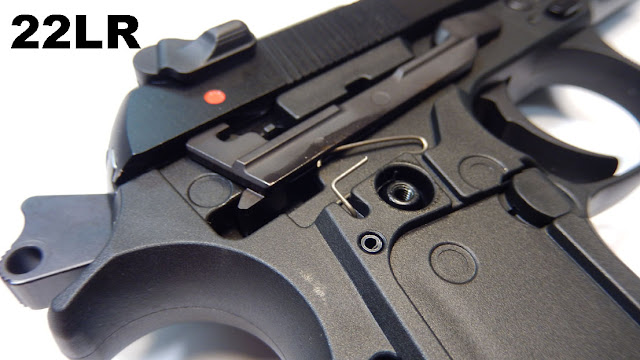
If you are familiar with my horror story on my Chiappa M9-22 you will be glad to know I have found a replacement. Not going to the Shot Shot makes it tough for me to search out new and interesting guns. So when a fellow youtuber told me about the Beretta M9-22 pistol, I had to take a look. Within 10 minutes of reading the specs and seeing probably the only video online of the gun (a useless video of the creator rambling and providing no real true info on the gun), I bought one from Buds GunShop. You can see my more in-depth video on this gun HERE (A MUCH BETTER VIDEO I MUST SAY) as well as some detailed pictures of this rimfire and the center fire version below.
When my M9-22 arrived I was immediately impressed. It felt exactly like my Beretta 92f 9mm pistol that I use in Production Division to shoot USPSA matches. If you have not seen USPSA or IPSC style shooting you can see some heart pounding first person shooter video on my YouTube channel. Anyway, right out of the box, the pistol felt the same in my hands with the exception of a few missing ounces in weight. Additionally the trigger feels the same with no changes in geometry. The decocker works just like any other but is a bit harder to disengage. It's unclear if it is just stiff due to the newness of the parts, or if its plastic construction has more friction than the metal parts found on the 9mm version. Either way, the controls work exactly the same. The take down lever works in the same manner as the 92 series pistols separating the slide, barrel and recoil spring from the frame. Different from my 92f 9mm model is a captured recoil spring with a plastic guide rod on the M9_22.
The gun itself is not made by Beretta, but made by Umarex who makes many other 22 clones, like the Colt 1911-22 and Smith & Wesson M&P22 pistols. My gun came with one 15 round magazine. I deem this a High Capacity mag since most .22lr pistols have only 10 round factory mags and require special UPGRADE KITS to get additional rounds in the magazine. At the time of this article, finding replacement magazines for the M9 22lr pistol might be challenging but we found some HERE.
Also a very note worthy aspect of the mags, or rather how the magazines fit into the frame of the pistol... If you shoot many rim-fire pistols you know how delicate the insertion of these magazines can be when putting one in the gun. The narrowness of the magazine in conjunction with the opening in the butt of the pistol make inserting a mag less fluid than with a center-fire pistol. The M9-22 does not have this problem. The 92 series pistols have a rather large pistol grip to accommodate the double stack magazines and this 22 version is nothing different. However, Beretta has made what I like to call an internal magwell inside the pistol grip. When looking at the opening for the magazine, it almost looks as if a full sized double stack magazine might fit but the opening narrows down quickly like funnel. This funnel or internal magwell allows this shooter to insert a fresh magazine much more quicker than traditional 22 pistols.
Sights on the M9-22 are just like what came on my 92f way back in 1989, a plain and simple 3-dot system. Just like my 9mm version, my new 22 caliber M9 would not hit for me. Mine shoots low and even after putting on a shorter front sight (the gun came with two front sights of different heights), mine still shot low. I guess my only option is to fit it with an adjustable rear sight or file down one of the plastic front sights.
At a quick glance the internals look very similar to the centerfire models but I'm sure they are not interchangeable. You can not put a 22 slide on a 9mm frame and vice versa. The barrels can not be switched between guns and the trigger can not be swapped. I'm sure that was done for safety reasons but I find the similarities between the 22 version and 9mm version the coolest. Even though the parts are not the same, it's clear that Umarex closely followed the 92 series design.
Another cool feature of the M9 22lr is that the grip panels are interchangeable with centerfire panels. This is a good thing since my 22 pistol came with what I can only assume was lesser quality plastic grips. Yes they were branded with the Beretta logo and all but the trigger bar spring on my gun that sits behind the right hand grip pushed my grip out and away from the gun. This created an unsightly gap that was quickly fixed by putting on an old pair of plastic grips I had sitting around. It should be noted if you plan to "bling up" your M9 with some after market grip screws, they appear to NOT be standard to the normal 92 series pistols. So you may need to find (if you can) some screws that are specifically for the 22 version.
My pistol shot everything I put it in from inexpensive bulk ammo to the high dollar CCI Mini Mags. Only failures was a couple of misfires with the bulk ammo where the round failed to go off when the hammer fell. This is easily fixed with the pull of the double action trigger with the hammer down on the dud. The second pull of the trigger set off the rounds. Having the ability to pull the trigger again on a dud is a great big positive for me since I love to shoot the least expensive ammo I can find. My only regret is that my gun does not have a threaded barrel for a suppressor. Hopefully that will be an upgrade offered in the near future. Aside from my love of the Beretta 92, this is one of the best 22 pistols I have run across in a very long time.
Tuesday, August 9, 2016
Mosin Nagant Trigger Return Spring Install Instructions
If you own one of the many imported Mosin Nagant rifle & carbine variations, chances are you are experiencing a "floppy trigger". Just like low testosterone there is a cure for this flaccid condition except less embarrassing. The solution is a simple low cost TRIGGER RETURN SPRING KIT installed on the trigger pin. You can get your trigger return spring kit HERE. The procedure is easy assuming you can field strip / dis-assemble your rifle and put it back together. Below is an instructional video showing the procedure and noting some of the pitfalls you may encounter (if any). Additionally, detailed photos with step by step instructions can be found here on this page. Installation of the spring kit should in no way affect the weight of your trigger pull. It's a simple non permanent solution to an annoying problem that owners of this fantastic surplus rifle have to deal with.
STEP 1: With rifle unloaded, remove the bolt by opening the bolt and pull to rear with trigger depressed.
STEP 2: If present, remove cleaning rod by unscrewing.
STEP 3: Depress and slide off both barrel bands towards the muzzle.
STEP 4: Once the barrel bands are off, you can remove the top hand guard.
STEP 5: Remove the screw on the underside of the rifle just in front of the magazine and the screw on top at the rear of the receiver.
STEP 6: Remove the magazine and trigger guard.
STEP 7: Remove the barreled receiver from the wooden stock.
STEP 8: Remove the screw in front of the trigger. If yours is tight, heat may be needed to break it free.
STEP 9: Remove the trigger pin. Depending on your rifle, this pin may only go in/out in one direction. Remove the trigger and sear.
STEP 10: Install the curved washer.
STEP 11: Place the sear and trigger in place and re-install the screw.
STEP 12: Take the included fishing line and loop it through the spring.
STEP 13: Install trigger pin halfway through the receiver and trigger leaving room for the spring. Snake the two ends of the fishing line through the trigger from front to rear and pull the spring through until you can push the trigger pin into place through the spring. Discard the fishing line.
Subscribe to:
Comments (Atom)


